That sharp, stabbing pain in your wrist during a bench press is a progress-killer. It’s a common complaint I hear from lifters, and almost every time, it comes down to a few simple, easy-to-fix issues with form. The goal is straightforward: create a solid, stable column from your hand to your elbow by stacking your wrist joint directly under the bar.
Why Your Wrists Hurt During Bench Press
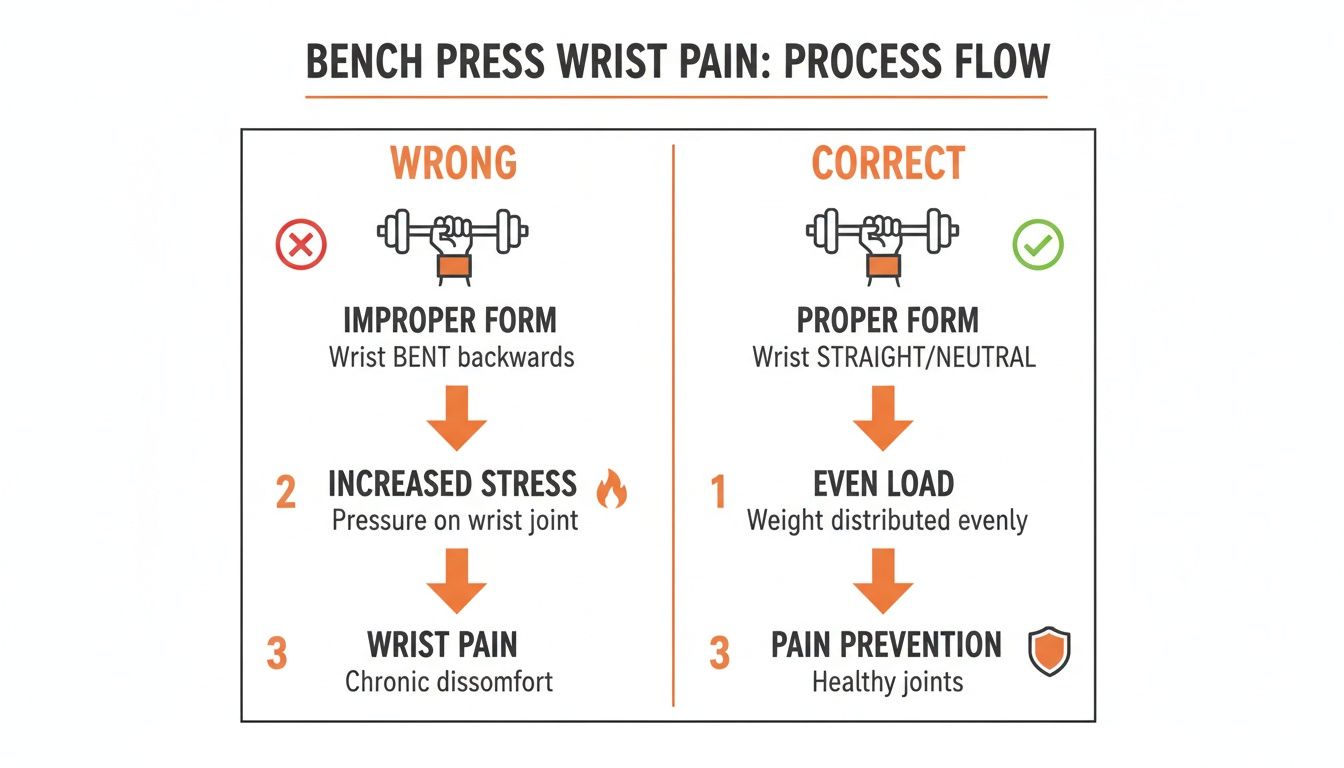
That pain isn't just bad luck; it’s a clear signal from your body that your mechanics are off. When you let the bar bend your wrist backward (hyperextension), you’re putting a ton of shearing force on the small, delicate bones and ligaments in your wrist. It's a small joint trying to support a load it was never built to handle in that compromised position.
Imagine your hand and forearm as a single, solid pillar. If that pillar is straight and vertical, it's incredibly strong. But the moment you introduce a bend—like a bent wrist—all that force gets concentrated right at the weakest point. That's when you feel the pain.
Quick Fixes for Common Bench Press Form Errors
Getting to the root of the problem is the first step to benching pain-free. Most of the time, the issue is a small, subtle mistake in how you set up and grip the bar. This table breaks down the most common culprits I see and how to fix them on the spot.
| Common Mistake (The Cause of Pain) | Correct Technique (The Solution) |
|---|---|
| "Bent-Wrist" Grip: Letting the bar roll back toward your fingers, causing the wrist to bend back under the load. | "Stacked" Grip: Align your forearm bones directly under the bar. A great cue is to think "knuckles to the ceiling." |
| High Bar Placement: Resting the bar too high in the palm gives it the leverage it needs to force your wrist into extension. | Low Bar Placement: Set the bar deep in the heel of your palm, right over the wrist and forearm. This provides a solid base of support. |
| Passive Grip: Just holding the bar loosely without much tension. This leaves the wrist joint vulnerable and unstable. | Active Grip: Squeeze the bar like you're trying to crush it. This creates tension that radiates up your arm, locking everything in place. |
By consciously applying these corrections, you can often feel an immediate difference in stability and a reduction in pain.
Of course, sometimes the issue can be more than just form. If the pain feels like numbness or tingling, it could be related to carpal tunnel syndrome, and exploring carpal tunnel treatment non-surgical options might be beneficial. It's also crucial to know when you're dealing with a real injury versus standard muscle soreness. Our guide on muscle soreness vs. injury can help you tell the difference.
Don't just brush it off, either. Wrist injuries are a bigger deal in lifting than most people think. One study found wrist injuries were the most common musculoskeletal issue among heavy weightlifters, accounting for 32% of all complaints—even more than shoulder issues. Of those injuries, 50% were moderate and 6.7% were severe, which really drives home why you need to get ahead of the problem early. You can read more about these findings in the International Journal of Health Sciences and Research.
Nailing the Perfect Grip to Bench Press Pain-Free
Your bench press lives and dies by your grip. It's your only connection to the bar, and if you get it wrong, your wrists will be the first to complain. The goal is simple: create a rock-solid column of support from your knuckles all the way down to your elbow.
I like to think of this as "joint stacking." Your wrist joint needs to be positioned directly on top of your forearm bones. This creates a powerful, straight line that lets you drive force directly into the bar. The moment your wrist bends back, that line breaks, and all that weight gets dumped straight into the delicate joint. That’s a fast track to wrist pain.
Finding Your Grip Sweet Spot
First things first, let's talk about where that bar sits in your hand. A common mistake is letting it rest high in the palm, close to the fingers. This gives the bar all the leverage it needs to peel your wrist back the second you take the weight.
Instead, get that bar deep into the heel of your palm. It should feel wedged in there, sitting right over your wrist and forearm. This single adjustment creates a much more stable shelf for the bar and stops it from rolling back into a compromised position.
Once you’ve found that spot, wrap your thumb all the way around the bar. I know the thumbless or "suicide grip" feels more natural for some lifters, but it dramatically cuts down on your stability and, well, the name says it all. A full grip is a safe grip.
My Go-To Tip: If you're still struggling, try the "bulldog grip." Rotate your hand slightly inward before grabbing the bar, so it runs diagonally from the heel of your palm toward the base of your index finger. This angle almost forces your wrist into that strong, stacked position. It’s a game-changer.
Turning Your Grip From Passive to Active
Now that the bar is set, don't just hold it—try to crush it. Squeezing the bar as hard as you can sends a signal up your arm, creating tension through your forearms, lats, and upper back. This locks you in and turns your entire upper body into a single, powerful unit.
Here are a couple of cues I use with clients to lock in their grip:
- "Break the bar": Imagine you're trying to bend the bar in half. You won't actually bend it, but the act of trying to snap it will instantly engage your lats and triceps, pulling your shoulders down and back into a super stable position.
- "Knuckles to the ceiling": This is your mantra for the entire lift. Keep those knuckles pointed straight up. It’s a simple reminder that prevents your wrists from sagging backward under the load.
Grip technique is huge, but sometimes you need a little extra help. Using chalk can make a world of difference. For a deep dive, check out this great resource on A Lifter’s Guide to Liquid Chalk for Weightlifting.
Of course, a perfect grip is only one piece of the puzzle. You need to plug it into a smart training plan. Our guide to building a 4-day push-pull workout routine shows you how to structure your week for strength and recovery. Start with these fundamentals, and you’ll build a stronger, more confident, and pain-free bench press.
Building Resilient Wrists and Forearms
When your wrists scream at you during a bench press, they’re sending a clear message: something is a weak link. More often than not, the pain is a sign that the supporting cast—your wrist joints and all the muscles in your forearms—just can't keep up with the demands of the lift. The answer isn’t to ditch the bench press, but to get strategic and build a rock-solid foundation that can handle heavy weight without complaining.
This goes way beyond just tweaking your grip. We need to actively strengthen the entire system. Forget about doing endless, mindless wrist curls; we're talking about a targeted approach that builds both real mobility and serious strength. It's time to turn your wrists from a nagging liability into a source of stability and power.

Essential Mobility Drills
You can't strengthen a joint that can't move properly. If your wrists are tight, they'll be forced into bad positions as soon as you put a load on them, and that’s a direct path to pain.
Work these simple drills into your warm-ups before you even touch a barbell:
- Kettlebell Wrist Rotations: Grab a light kettlebell (even a small hammer works) by the handle, with the heavy end pointing to the ceiling. With total control, slowly rotate the weight in a big circle, making sure the movement comes only from your wrist. Aim for 10-15 controlled circles in each direction.
- Prayer & Reverse-Prayer Stretches: First, press your palms together in front of your chest (like a prayer) and gently lower your hands to stretch the inside of your forearms. Then, flip your hands over so the backs are touching and your fingers point down (reverse-prayer) to hit the extensors. Hold each stretch for 20-30 seconds.
Doing these consistently will prep the tissues for the stress of lifting and genuinely improve your joint health over time.
A common mistake is thinking wrist issues are isolated. The wrist is a delicate joint, and its stability is heavily dependent on the strength of the larger forearm muscles that control it. Building robust forearms is non-negotiable for anyone serious about pressing heavy.
Core Strengthening Exercises
With your wrists moving better, it's time to build the muscular armor that will protect them. The real key here is balance—you need to strengthen both the flexors (on the bottom of your forearm) and the often-ignored extensors (on top). That balance is what creates a truly stable joint. Of course, you also have to be smart about your overall training volume; our guide on how to prevent overtraining is a great resource for learning how to balance stress and recovery.
Try adding these to your routine as accessory work 2-3 times per week:
- Heavy Hammer Curls: This is a powerhouse for building the brachioradialis, a key muscle for wrist stability. Grab a heavy dumbbell and really focus on a slow, controlled negative on every single rep. Go for 3 sets of 8-12 reps.
- Farmer's Walks: Grip strength is forearm strength. It's that simple. Grab the heaviest dumbbells or kettlebells you can safely hang onto and just walk. This builds incredible isometric strength and endurance from your hands to your elbows, which translates directly to a more locked-in bench press grip.
- Dumbbell Wrist Extensions: Sit on a bench and rest your forearm on your thigh, letting your wrist hang off the end with your palm facing down. Using a light dumbbell, let your hand drop down slowly, then extend it back up, actively squeezing the muscles on the top of your forearm. Do 3 sets of 15-20 reps to finally give those extensor muscles the attention they need.
How to Use Wrist Wraps and Gear Correctly
Wrist wraps can be a lifesaver for managing wrist pain on the bench, but there's a big "if" – you have to use them correctly. I see lifters all the time making one crucial mistake: they wear their wraps way too low, turning them into fancy forearm bracelets. Worn like that, they provide zero support to the actual wrist joint, which completely defeats the purpose.
The whole idea behind a wrist wrap is to create a sort of rigid cast around the joint itself. This physically stops your wrist from bending back too far (hyperextending) when you've got a heavy barbell in your hands. When you get the placement right, the wrap gives you the external stability your own tissues might be struggling with, helping you lock in that strong, stacked wrist position we talked about earlier.
It's just like taping an ankle. You wrap the joint, not your shin. Same exact principle here. Getting this right is the difference between a powerful support tool and a completely useless accessory.
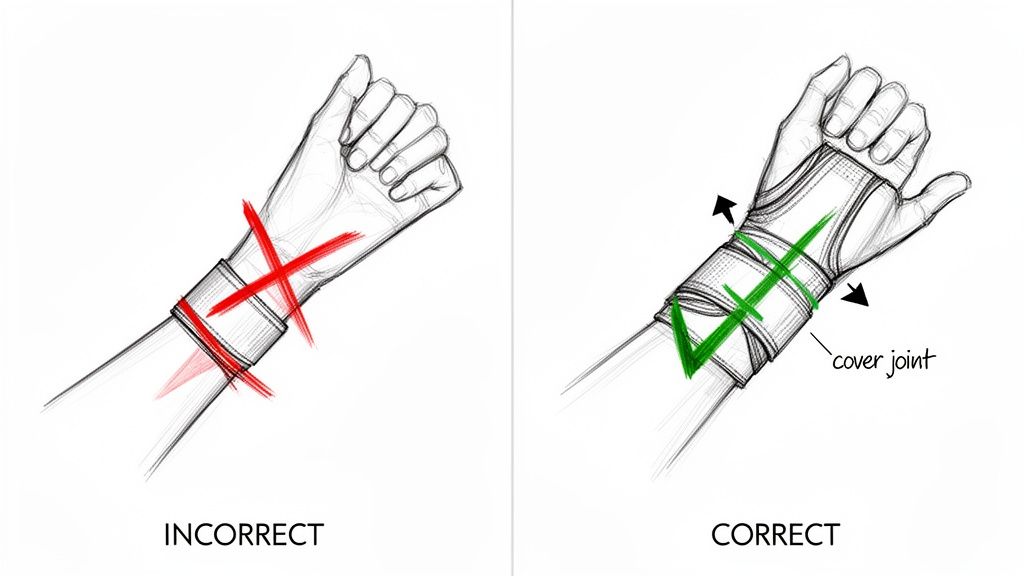
Proper Wrap Placement and Tightness
Okay, let's get this right. Start the wrap just below the base of your fingers and wrap down towards your forearm. The absolute key is to make sure the material fully covers your wrist joint. A good rule is to have about half the wrap above the joint crease and half below it. This is non-negotiable if you want real support.
As for tightness, pull it snug. You don't want to cut off your circulation, but it should be tight enough to seriously limit how far your wrist can bend backward. My personal method is to crank them down right before a heavy set, and then as soon as the set is over, I loosen them up or take them off completely. There’s no need to keep your hands in a vice for the entire workout. Speaking of in-between sets, check out our guide on how much you should rest between sets for muscle growth.
Pro Tip: Don't let wraps become a crutch for bad form or a substitute for strength work. They're a tool to support good mechanics under heavy weight, not a band-aid for weak wrists. Keep doing those mobility and strengthening exercises.
Choosing the Right Type of Wrap
Not all wraps are the same, and what you need really depends on how you train. They basically come in two flavors, and picking the right one matters.
| Wrap Type | Best For | Characteristics |
|---|---|---|
| Stiff Wraps | Max-effort singles, doubles, and triples (1-3 reps). | These offer maximum rigidity and feel like a cast. They're not the most comfortable but provide rock-solid stability for PR attempts. |
| Flexible Wraps | Higher-rep sets (5+ reps) and general training. | Made from stretchier material, they allow a bit more wrist movement. Much more comfortable for bodybuilding-style work and longer sets. |
If you're dealing with nagging wrist pain, a good flexible wrap is almost always the best place to start. It offers plenty of support for the bulk of your training, letting you get stronger without the constant ache. You can save those super-stiff, cast-like wraps for the days you’re chasing a new one-rep max.
Smart Programming to Prevent Re-Injury
Fixing your grip and building stronger forearms are huge wins, but keeping your wrists healthy for the long haul really comes down to how you structure your training. Just plowing through pain with the same old routine is a surefire way to develop chronic problems. Smart programming isn't about taking it easy; it's about working smarter so you can keep building strength without constantly sidelining yourself.
This really boils down to listening to your body and having a plan B ready to go. You won't feel 100% every single time you walk into the gym, and trying to force a heavy bench when your wrists are already screaming is just asking for trouble. The real secret to sustainable progress is learning to adapt your workout based on how you feel that day.
Use RPE to Guide Your Intensity
One of the best tools I've found for this is the Rate of Perceived Exertion (RPE) scale. Instead of being married to hitting a specific weight on the bar, you aim for a certain level of effort. For example, hitting a set at an RPE 8 means you finished feeling like you had exactly two good reps left in the tank.
On a great day, your RPE 8 might be 225 pounds. But if your wrists are feeling a bit beat up, maybe that RPE 8 is closer to 205 pounds. And that's perfectly okay.
By training with RPE, you’re essentially auto-regulating your intensity. It gives you a built-in system to push hard when you feel good and pull back just enough when you don’t, all while ensuring you still get a killer workout. This one shift from being weight-focused to effort-focused can be an absolute game-changer for managing bench press wrist pain.
Smart Exercise Swaps for Wrist Relief
Your training plan should always include some wrist-friendly pressing movements you can swap in on the fly. You don't have to skip chest day completely just because your wrists are acting up.
Here are a few of my go-to alternatives that take the strain off:
- Neutral-Grip Dumbbell Press: Keeping your palms facing each other is the easiest way to maintain a straight, stacked wrist position. This is often the first and best option for lifters dealing with wrist pain.
- Swiss Bar (or Football Bar) Press: This specialty bar is fantastic. It gives you a bunch of neutral and angled grip options, so you can almost always find a hand position that feels completely pain-free while still moving some serious weight.
- Floor Press: By pressing from the floor, you shorten the range of motion. This can take a lot of stress off both the shoulder and wrist joints at the bottom of the lift.
Having these exercises in your back pocket means you never have to waste a session.
The Built app makes it incredibly simple to track all this and see how your body is recovering, as you can see in the screenshot.
This visual heatmap shows you which muscle groups are fatigued and which are fresh, helping you make smarter decisions about your training day-to-day.
Keep an Eye on Your Overall Training Volume
Finally, take a hard look at your total workload. If your wrists are chronically sore, it could simply be an overuse issue—your joints just aren't getting enough time to recover between beatings. Managing your training volume, which is the total number of sets and reps you do each week, is non-negotiable.
If you’re in a flare-up, try dialing back your total weekly pressing sets by 10-20% for a little while. Give your joints a chance to breathe, heal, and adapt. As the pain subsides and your wrists get stronger, you can gradually start adding that volume back in. Learning how to manage this is a critical skill, and you can dive deeper into finding the right training frequency for hypertrophy in our detailed guide.
Ultimately, it’s this intelligent dance between stress and recovery that builds a truly resilient, injury-free lifter.
When to Call in a Professional
Most of the time, bench press wrist pain is a mechanical problem. You can usually fix it yourself with better form, smarter programming, and some targeted strength work. But, and this is a big but, you have to know when to stop playing doctor and get real expert advice.
Pushing through the wrong kind of pain is a one-way ticket from minor annoyance to a chronic injury that just won't quit. Your body sends out pretty clear warning signs when something is genuinely wrong. Learning to listen is a skill every serious lifter needs to master for long-term health and progress.
Red Flags That Mean "Stop"
If any of these symptoms show up, it's time to put the brakes on your training and book an appointment with a physical therapist or doctor. These aren't your typical aches from a sloppy rep; they can signal bigger problems like a sprain, fracture, or nerve issue.
- Sharp, lingering pain: Does it still hurt long after your workout is over? Or ache even when you're just sitting around? That's a red flag.
- Visible swelling or bruising: Any puffiness or discoloration around your wrist joint is a clear sign of tissue damage.
- Numbness or tingling: If you're getting "pins and needles" in your hand or fingers, that could point to a nerve being compressed or irritated.
- Loss of strength or range of motion: Suddenly can't grip a dumbbell as tightly or find it hard to move your wrist around freely? Pay attention.
Don't be the person who just "trains through it." The bench press is an incredible upper-body builder, but it's notorious for causing musculoskeletal problems. One study looking at lifters with shoulder pain from benching found that a staggering 76% had tendinitis. It’s a powerful reminder of how easily pressing can lead to serious joint issues. You can read more about these findings on Frontiers in Physiology.
Ignoring these signals can put you on the sidelines for way longer than a quick visit to a PT ever would. A good professional can pinpoint exactly what's wrong and give you a specific plan to get you back under the bar, lifting heavy and without pain.
Here at Built, we're all about helping you train smarter, not just harder. By tracking your workouts and keeping an eye on muscle recovery with our visual heatmaps, you can make better decisions to avoid overtraining and stay ahead of injuries. Download the Built app today and start building a more resilient body.